External filter for a 26 gallon or bigger aquarium - Instructions, Diagram and Forum
Quick links - Answers
Advice by Mick, keeping fish since 1976

Brief Description
his page is a guide on making your own external filter; You're welcome to ask questions or share tips at the bottom of this page! If you came here searching for other information regarding filtration simply click this link to be forwarded to a list of filters-related articles on our website!
Doing yourself an external filter is not really difficult, but needs a bit of patience. Building a filter by yourself is a good solution for those people who need a higher filtering (for big fish, turtles etc.) and do not want to spend a lot of money.
Materials
- 13mm garden poly pipe. It’s is usually cheap so take a good measure: think it has to start inside the aquarium go down on the floor and come back.
- 13mm tap. You need 2 taps, one for the way in pipe, and one for the way out. These are extremely useful to isolate the filter in case you need to move it.
- 2 or 3 gallon polycarbonate water bottle with large neck (the pump has to pass in it). You need just one bottle, the size depends on the size of your aquarium.
- Aquarium silicone.
- submersible aquarium water pump. The speed of the pump depends on the size of your aquarium; read the instructions on the pump before buying. Prefer anyway powerful pumps at least 400 litres per hour.
- filter materials like (foam, ceramic rings etc.)
Optional:
- clamps and suckers to ensure the pipes to the aquarium glass.
- gum gasket in case the bottle stopper has not one.
Building the filter
Step 1 (see img1)
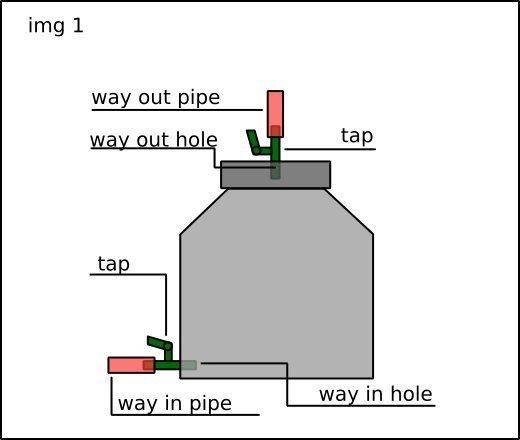
- Way in pipe: cut the poly pipe, keeping in mind it has to start inside the aquarium and end on the floor, cut some inches longer not to have the pipe tight. Take the water bottle and make a hole 3 inches from the bottom. Put a tap in this hole and lock it with silicone.
- Way out pipe: cut the poly pipe as you have done for the other one. Take the bottle stopper and make a 13mm hole on the top. Moreover, if the stopper has not the gum gasket, take one and lock it inside (you can help yourself with some silicone in case the gasket isn’t of the right size but make some tests to be sure it works fine). Put the other tap and lock it with silicone on the top of the stopper.
The filter is almost done, let the silicone dry for two or three days, then before adding the pump and the filter material, fill the filter with water to be sure there is not loss around.
Step 2 (see img2)
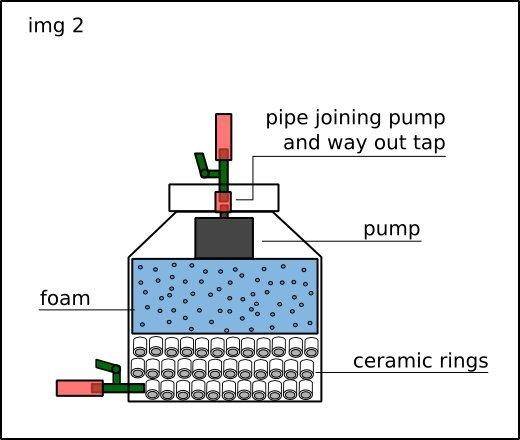
There are a lot of filter materials and they are a personal choice. In this project we suggest a half biological / half mechanical filter, and we use ceramic rings and foam.
- Insert the ceramic rings in the water bottle, to fill almost half filter.
- Add the foam and fill, leaving some inches depending on the size of the pump.
- Rest the pump on the foam under the bottle stopper.
- Connect the way out of the pump with a small piece of poly pipe to join the tap on the stopper.
- Put a small grid at the start of the way in pipe (the side inside the aquarium) to avoid leafs, gravel and other small part to end in the filter.
Step 3 (see img3)

The filter is finished, but make some resistance and pump working tests before using it in the aquarium.
In example leave it filled with water for a week and see if there is water loss. And switch on the pump and see if everything works fine.
Before using it in your aquarium remember:
- Fill the filter before switching on the pump, or you risk to damage it.
- Be sure to use a submersible aquarium pump, because some pumps can’t stay under water.
- Put the filter on the floor, to take advantage of the communicating vessels effect.
Copyright note: This article is originally written by Michela Ferretti. Aqua-fish.net owns the full copyright of this article.
Recommended reading about filters within Aqua-Fish.Net
- The Purpose Of An Aquarium Filter
- Internal and External Aquarium Filters
- Tetra Whisper Filter
- Aquarium Filter Media
- Canister Filter in an Aquarium
- To Filter or not to Filter a Fish
- Fish Pond Filters
- Aquarium Filter Cartridges
- Undergravel Filters
- Aquarium Filer Pads
- About Fish Pond Filters
- Magnum and Penguin Aquarium Filter
- Aquarium Filter Systems
- Under Gravel filter Cleaning
- Diatom Filters for Aquariums