Making a DIY Lighting Canopy
(For the beginner) by Tim Gautrey, reprinted with permissions This How-To details a simple way to make a new lighting canopy for any rectangular tank.It is designed with simplicity in mind and easy enough for almost anyone with basic DIY skills to make.
Tools:
- Hand Saw - Hammer - Screwdriver - Tape Measure - Pencil - Set Square - Electric drill - Selection of drill bits - Fine sanding sheets.
Materials:
- 9mm Plywood - 25mm x 25mm soft wood batten - Piano Hinge - Wood Glue - 25mm countersunk self-tapping screws - 15mm Panel Pins - White Undercoat - White Gloss paint - Varnish - 10mm wooden edging trim (If you want to trim the edges!) - Lighting unit(s)
Size:
For this How-To, I am going to detail a canopy to fit a standard 36” (900mm) tank. You can work out the sizes to fit the tank you need from the guide sizes here. The light unit will be 200mm in overall height and square in shape.
Measure the length of the tank and add 24mm to get the length of the front and back panels. For this build it came to 924mm.
Measure the front to back length and add 6mm to get the size of the side panels. For this build it came to 306mm.
You now know the size of the four upright panels to make the box. They are:
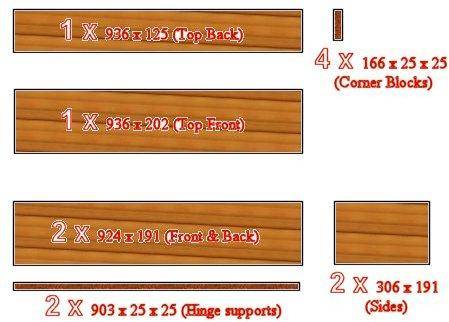
2 x 924mm x 191mm 2 x 306mm x 191mm
Why 191mm when the overall height is going to be 200mm? It has to have a lid!
That’s the next size to work out. The lid can overhang the sides and front by 6mm if you wish, or be flush, the choice is yours. I prefer the overhang personally, but it may not suit your setup. Let’s work on my preference for now.
The overall dimension of the light box is 924mm x 324mm, so the lid needs to be cut at 936mm x 330mm and cut in two pieces to allow for access. So the cutting list should be:
1 x 936 x 125 1 x 936 x 202
That doesn’t add up to 330mm! Why? You need to leave a little clearance for the hinge to work. I have allowed 3mm for this purpose.
Corner Blocks:
These serve two purposes. Firstly, they help to make the corners stronger and square, and secondly, they sit on top of the tank and stop the cover sliding down!
The length of these for this build is 166mm, which allows the canopy to sit 25mm over the top of the tank. You need four blocks at this length. Be sure that you cut the ends nice and square!
Hinge supports:
You also need a batten to strengthen and keep the lid straight over the length, and take the screws you will use to fit the hinge, since these will come through the plywood and be dangerous. These timbers (2) will be 903mm each.
Here is a drawing of all the different components that need to be cut, with dimensions:

That wasn’t so difficult, was it? I’m assuming you went ahead and cut the pieces out, of course! Once they are all cut, clean all the raw edges with sanding paper, so that they are all nice and smooth.
Assembly:
You have all the components now, so let’s start putting them together.
Take the back panel and draw a line 9mm in from each end, top to bottom. This is a guide to fit the corner blocks in place. Using the drill, drill two 5mm holes each end, 25mm from the end and 25mm and 135mm from the top of the panel. Take the first corner block, apply a bead of wood glue to one face and position flush with the top of the panel, inside the line you drew, as below:

Carefully lift the panel up so that you can screw the blocks in place, taking care that the blocks don’t move off the line. Repeat on the front panel.
Now take the side panels, drill two 5mm holes 12mm from each end, 20mm and 130mm from the top edge. Take the back panel, stand it up with the top downwards, so the blocks and the top of the panel sit on the worktop. Apply a bead of glue to the side face of the corner block, position the side panel tight into the corner and screw it in place. Repeat with the other end, giving you three sides of the box. Fit the front panel in the same way, slotting it in between the two sides and screwing in place. Make sure that you have it the right way up, so all the corner blocks are flush at the top! (Might sound stupid, but I have got it wrong!) Here’s what it should look like:

We now have a four-sided box without a lid. Take the back part of the lid, apply some glue to the top of the box back and a little on the sides and position the lid section flush with the back and overhanging equally both sides. Use panel pins to secure this in place. You might want to drill and screw the corners as well, if you are not going to give the glue time to dry before going on!
Fit the hinge support next. This should be flush with the front edge of the rear lid section and centrally spaced from each side panel. Drill 4 5mm holes, equally spaced along the length, 12mm in from the front edge of the panel, run glue along the face of the batten, position and screw it in place. You can now fit the piano hinge. A tip with this is to open the hinge right up, so that the other side of the hinge folds right down over the edge of the timber, giving you a nicely positioned hinge, which is straight along the edge. Screw this in place all the way along the lid, making sure that it’s centrally positioned from both ends.
Nearly there, at least on the assembly of the box. The flap part of the lid is next. Fit the support batten to the back of the lid section, flush with the edge as before. Lay it on the box, and line up with the other section and the hinge, leaving a small gap where the hinge is, so that if the wood swells with moisture, the lid won’t be too tight to work properly. Screw the hinge onto the flap and you’re almost there. Fit it over the tank, to make sure it’s all correct. It should fit nice and snug and sit down about 25mm over the top lip.
What about the air pipes and wires? They’re all being pinched! And my HOB filter pipes won’t let the box fit either! Yes, we need to cut slots in the back panel to allow for these, and exactly where you cut the slots depends on where the wires and pipes are entering the tank. They are normally in one or both corners but mark the positions on the back panel and cut out slots for the respective pipes and wires.
If you want to trim the edges of the lid, use the trim and glue and pin in place, just to tidy the job up. You can also trim the bottom edge using the same method to really give a professional finish.
That’s the assembly of the light box finished. Now it has to be waterproofed to stop the condensation getting into the timber. The easiest way to do this is with ordinary gloss paint. Turn the box over and paint the inside, paying special attention to the corners and the corner blocks. Don’t be sparing with this, it will make the difference between a permanent job, or a “do-it-all-again-in-12-months-time” job!
I varnish the outside, because it’s my personal preference, but it’s up to you and depends on the finish you want.
Once the paint and varnish is dry, you can fit the lighting to the rear panel or the back section of the lid, depending on the type of lighting you use. Run the wires through the slots you’ve cut in the back panel and you’re done!
Variations of this design:
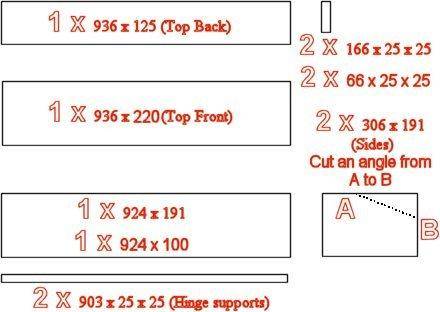
You might prefer a sloping lid, rather than a square box, in which case you need to modify the cutting slightly for this. On the side panels, you need to cut an angle from where the lid back section ends to the front, and adjust the height of the front panel to suit. As a guide, I would mark an angle from 125mm from the back of the side panel to the front, leaving at least 100mm height at the front. Don’t forget that the corner blocks will also have to be trimmed down to suit. Here is a drawing showing the differences:

Other than the cutting of the timber, the assembly is the same.
Enjoy!