The Ultimate Guide to Aquarium Backgrounds: Types, DIY Tips, and Best Practices
Quick Links - Navigate the Guide
Brief Description
This detailed guide explores everything you need to know about aquarium backgrounds — from simple poster sheets to immersive 3D rock structures. Discover how the right background can transform your tank both visually and functionally. Learn the pros and cons of each type, how to build your own safe and stunning designs, and how to avoid common mistakes. Whether you’re a beginner or advanced aquascaper, this article will help you choose the best background solution for your aquarium and your fish.
Updated: April 2025
🎯 Introduction
Aquarium backgrounds may seem like a minor detail, but they play a surprisingly important role in the aesthetics and functionality of any fish tank. A well-chosen background doesn’t just improve visual appeal — it also helps hide equipment such as filters, heaters, and tubing, creating a clean and cohesive display.
Beyond aesthetics, a background can reduce fish stress by minimizing reflections and outside distractions. It can make shy species feel more secure and enhance the overall atmosphere of natural or themed aquascapes. Whether you're aiming for a lush jungle, a rocky Malawi habitat, or a modern minimalist look, the right background helps complete the scene.
There are many options to choose from, including:
- No background — leaving the tank transparent
- Painted glass — usually black or blue for simplicity
- Poster backgrounds — colorful scenes or realistic textures
- 3D backgrounds — sculpted or handmade panels for depth
- Natural materials — slate, cork, or rocks used as backdrops
This guide will walk you through the pros and cons of each option, offer DIY ideas, and help you choose the best background for your aquarium's needs — whether you're a beginner or a seasoned aquascaper.
✨ Benefits of Using a Background
Installing a background in your aquarium has more benefits than one might expect. While it often starts as an aesthetic choice, it can significantly improve the environment for both fish and the viewer.
- Hides unwanted elements: Backgrounds cover up power cables, filters, heaters, and wall textures behind the tank. This results in a cleaner and more professional appearance.
- Reduces stress and reflection: Transparent or reflective glass can confuse or stress fish, especially species prone to reacting to their own reflection. A solid or patterned background helps minimize these distractions and offers a sense of security.
- Creates a cohesive biotope look: Whether replicating a rocky Rift Valley setup or a lush Amazonian jungle, the right background helps complete the illusion of a natural habitat. This enhances both the fish’s comfort and the visual appeal of the tank.
In short, a background is not just decorative — it’s also functional. From concealing gear to improving fish behavior and boosting immersion, it’s one of the easiest upgrades you can make to your setup.
🧱 Types of Aquarium Backgrounds
1. No Background
This is the simplest option — just leave the back of the tank transparent. It can work well if your aquarium is backed by a neutral-colored wall or dense aquatic plants that cover the rear. However, it exposes all wiring and equipment and can create visual clutter. Reflections may also disturb some fish species.
2. Painted Glass
Painting the back panel of the aquarium is a popular DIY method. Use non-toxic, waterproof paints — gloss or acrylic — and apply them before setting up the tank. A matte black, navy blue, or deep green finish provides contrast and hides equipment well. Painting is cheap, durable, and maintenance-free, but cannot be changed easily afterward.
3. Poster or Vinyl Backgrounds
These are the classic store-bought backgrounds — thin sheets with printed designs like rocks, plants, or underwater scenes. They are usually taped or glued to the outside of the tank. Pros: they’re affordable and easily replaceable. Cons: they often bubble or peel off over time and may appear less realistic, especially under strong lighting.
4. 3D & Sculpted Backgrounds
These internal backgrounds are made from Styrofoam, fiberglass, or molded resin. They offer a realistic rock or root structure and are often used in cichlid or biotope tanks. Custom-built or DIY options allow you to shape and paint them as needed. Downsides include cost, time investment, and reduced tank volume. Always seal them with aquarium-safe epoxy or pond paint before installation.
5. Natural Materials (Slate, Cork)
Some aquarists use slate tiles, cork bark, or tufa rock to create a natural backdrop. These can be siliconed onto the glass to form a unique and safe structure. Slate gives a modern dark stone look, while cork or tufa rock can simulate cliffs or caves. Make sure materials are non-toxic and securely fixed to prevent injury or collapse.
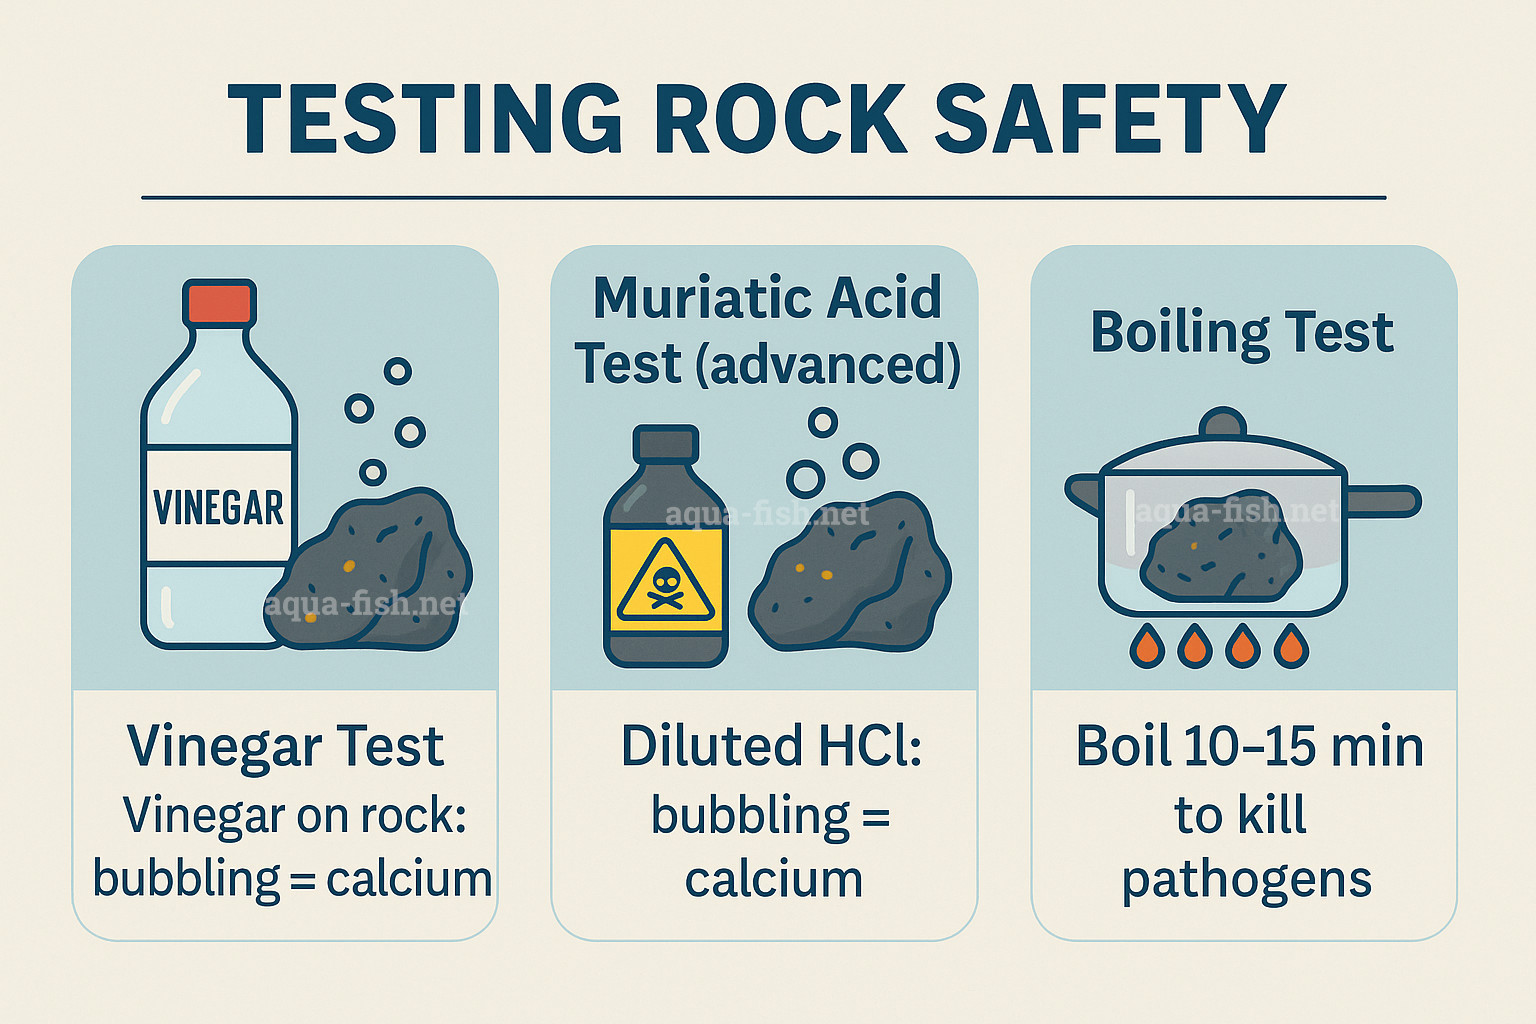
How to Test Rock Safety:
Not all stones are suitable for aquariums. Some may release calcium carbonate, which raises
water hardness and
pH — potentially harming softwater species. To test a rock:
- Vinegar Test: Drop a few drops of regular vinegar on the rock. If it bubbles or fizzes, it contains calcium carbonate and may not be ideal for all tanks.
- Muriatic Acid Test (advanced): For more precise testing, use diluted hydrochloric acid (commonly used for pools). Always wear gloves and perform this test outdoors. Bubbling indicates calcium presence.
- Boiling Test: Optional safety check — boil the stone in water for 10–15 minutes to kill parasites or contaminants. Never boil slate (it may crack) or sealed materials like petrified wood.
Stick to rocks known to be aquarium-safe, such as slate, lava rock, dragon stone, and seiryu stone (note: seiryu may raise hardness slightly). Avoid limestone unless keeping hardwater-loving species like African cichlids.

🛠️ How to Make Your Own Background (DIY)
Creating your own aquarium background is a rewarding project that can save money and offer total creative freedom. Many aquarists choose DIY backgrounds to match specific biotopes or simply for the satisfaction of crafting something unique. Below are common materials and methods used in DIY setups.
🔲 Polystyrene & Sculpted Rock Backgrounds
Styrofoam (polystyrene) is widely used due to its ease of shaping. Cut large sheets to fit the tank’s back wall, then glue smaller, irregular pieces to mimic rocks or roots. Shape the surface with a heat source (blow torch or heat gun) to melt and round sharp edges, creating a natural look.
After sculpting, seal the surface with aquarium-safe epoxy resin or clear pond paint. You can color it using non-toxic stone-colored paints or apply sand over wet silicone for a textured finish. Always let the background cure for several days before placing it in the tank.
⛰️ Slate or Tuffa Rock Backgrounds
Slate tiles create a sleek, natural dark background. Cut tiles to size and silicone them directly to the back glass. For larger features, lightweight rocks such as tuffa can be arranged into dramatic formations — just be aware that some rocks may alter water chemistry over time, especially in softwater tanks.
To prevent leaching, seal porous rocks with epoxy or clear pond paint. Ensure good adhesion and allow full curing before filling the aquarium.
🌿 Cork & Natural Textures
Cork tiles can also be layered to form attractive, earthy backdrops. They are safe for long-term submersion and can even support plant growth. Silicone them carefully to the glass and make sure to leave space for equipment and water flow.
⚠️ Safety Notes
- Always use aquarium-safe adhesives and coatings — never regular glue or paint.
- Cut holes or channels in the background for filters, heaters, and tubing before installation.
- Allow all components to fully cure and off-gas (usually 48–72 hours) before adding water or fish.
- Double-check that your background is firmly attached to avoid collapse or fish entrapment.
💡 Tips & Best Practices
Installing an aquarium background isn’t just about looks — it's also about function, safety, and long-term durability. Here are some practical tips to help you avoid common mistakes and ensure your background stands the test of time.
🔒 Secure Installation
- Use aquarium-safe silicone when fixing backgrounds inside the tank. Apply generous lines along the edges and allow at least 48 hours of curing time.
- For poster or vinyl backgrounds, you can use tape, spray adhesive, baby oil, or even water to get a bubble-free finish. Smooth the surface with a credit card or rubber squeegee to eliminate air pockets.
- If you're painting the back glass, do it before filling the tank. Use rollers for even coverage, and let the paint dry completely to avoid chemical contamination.
🌊 Water Flow & Equipment Access
- Always leave space for filter intake/output, heaters, air stones, or CO2 lines. DIY 3D backgrounds should have cutouts or channels to avoid blocking water circulation.
- For hiding equipment, plan “service corridors” or leave small gaps behind the background where wires and tubing can run safely.
🛠️ Troubleshooting Common Issues
- Poster lifting from glass: Reapply using baby oil or clear adhesive. Ensure the glass is clean and dry before installation.
- Leaks behind 3D backgrounds: Seal all seams with aquarium silicone. Use black silicone for aesthetics and better visibility during application.
- Reflection issues: Opaque or dark backgrounds reduce unwanted reflections that may stress fish, especially species prone to hiding or territorial behavior.
With proper planning and care, your background won’t just be decorative — it will be functional, safe, and long-lasting.
📌 Recommended Background by Tank Type
Each tank type benefits from a different kind of background. Here's a visual summary to help you choose the best one:
🌿 Planted Aquarium
Use painted glass (black or green) or a plain vinyl background to highlight plant colors and shapes.
💎 Malawi/Cichlid Tank
Choose a 3D rocky background or DIY foam & cement sculpture to match natural rocky biotopes.
🌳 Amazon Biotope
Use cork tiles or root-styled 3D backgrounds to mimic tree roots and earthy textures.
🧪 Breeding Tank
Keep it simple with painted glass or no background to reduce visual stress.
🦐 Nano/Shrimp Tank
Use a minimalist painted background for clarity and calm, especially in small spaces.
🏆 Display/Show Tank
Go bold with a 3D background or slate/tuffa rock setup for impressive visual impact.
❓ FAQ
Can I Use Regular Wallpaper as a Background?
Technically yes — but it’s not recommended. Most wallpapers are not waterproof and may fade, wrinkle, or mold when exposed to moisture. If you really want to use a decorative paper, make sure it’s protected behind glass or sealed plastic. For best results, choose vinyl or laminated poster-style backgrounds designed for aquariums.
Can I Change the Background Without Draining the Aquarium?
Yes — but it depends on the type of background. External backgrounds (posters, vinyl sheets, painted glass) can be removed and replaced without disturbing the tank. However, internal 3D backgrounds glued with silicone cannot be removed without draining at least part of the water, as access and safe removal become challenging when the tank is full.
My Fish Are Scared of Their Reflection. What Should I Do?
This is a common issue, especially in tanks without a background. Transparent glass can act as a mirror, which may stress territorial or shy fish. The solution is to add a non-reflective background — painted glass or a dark poster works well. Avoid glossy or brightly lit backdrops, as they may worsen reflections.
🖼️ Image Gallery
🏁 Conclusion
Aquarium backgrounds may seem like a small detail, but they play a significant role in both the aesthetics and well-being of your aquatic environment. From hiding unsightly wires to reducing fish stress and enhancing biotope realism, a well-chosen background adds depth and character to your tank.
For smaller or minimalist tanks, a painted background or simple poster may suffice — offering ease of application and clean visual impact. For large display tanks or biotope setups, 3D or natural-material backgrounds like cork or slate offer stunning visual results and functional benefits.
No matter which type you choose — DIY or commercial — ensure all materials are aquarium-safe, and always consider your fish's comfort first. A calm fish in a well-designed environment is the ultimate goal of every aquarist.


